Understanding HTML Basics for Web Scraping


Understanding the basics of HTML is a prerequisite to scraping a website, assuming you already have a good foundation in Python. This blog is a follow-on from the earlier blog on What is Web Scraping, and What it is Used for?
Why is it a prerequisite? HTML is one of the languages essential for websites; that is why we need to understand it to scrape information. If you're thinking, "man, another language to learn", fear not! It's easy peasy. The masses would agree that it is probably one of the easiest languages to master. Furthermore, if you're like me, just wanting to learn for web scraping and have no intention of becoming a professional web developer, then we don't need to go deep. Just understanding the basics will suffice.
So, what will we cover today?
- How the web works
- Three key languages for websites
- HTML Basics
- HTML Structure
- Elements and Tags
- Attributes
- Inspecting Pages with Developer Tools
How the Web Works
Before we delve into HTML, let's take a step back and look at how the web works.
Have you ever wondered what happens under the hood when you type in an URL in the address bar of a browser and hit ENTER? URL is the formal term for a web address. It is short for Uniform Resource Locator. Simply put, it is the location of resources. Resources can be images, texts, videos etc.
So what happens now that we've hit the ENTER button? To explain, we need to know the two key components involved in what follows:
- Client which is the browser and
- Server(s), which is the computer(s) that host our target website
The two together are known as the client-server model. The Client requests a service, and the Server provides the service. So, when we press that ENTER button, our browser sends a message to the Server and says, "Hey, give me the home page of this website, please", and the Server will send a message in response to the request. The first message is the HTTP request, and the second message is the HTTP response.

The message between the Client and Server(s) is formatted based on a protocol known as HTTP, short for Hypertext Transfer Protocol. You might have noticed that there is another variation of this: HTTPS. HTTPS is a secure version of HTTP. The message is encrypted.
What is in the response? A lot of information, such as:
- HTTP protocol version used,
- status code*, which is a number. 200 means it's ok, and 404 means not found.
On a side note, If you're a dog lover like me, you can check out all the HTTP Status codes and dogs. 😀 - date and time of the response
- type of content the Server is sending to the Client
- HTML code document
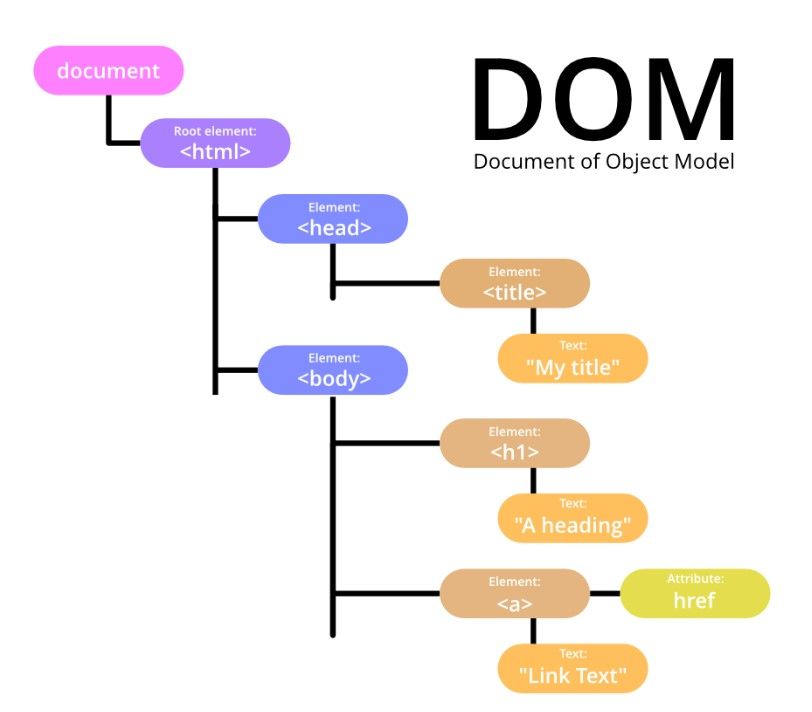
Our browser reads this document and displays it. In reading this document, it constructs what's called a DOM, which is short for Document Object Model. Don't let this fancy name intimidate you. It's just a model representing the object or elements in the HTML document, i.e. all the HTML building blocks to construct the webpage.
That's how the web works in a nutshell.
Three Key Languages for Websites
A website is made up of two parts: frontend and backend. The front end is what we see and interact with in our browsers. The backend is behind the curtains and is the part that powers the front end. The backend is about storing data in databases and providing it to the front end. The bit that's important for our purpose is the front end.
Three key languages that are important to build the front end are:
- HTML: HTML stands for hypertext markup language. It is used to define the building blocks of webpages essentially.
- CSS: CSS stands for Cascading Style Sheet. It is a styling language to style web pages and make them look beautiful.
- JavaScript: JavaScipt is a programing language. It is used for adding functionality to web pages. For example, when we click on a like button and the count of 👍 goes up, that's achieved using JavaScript.
Let me give you an analogy to crystalize in your mind how these three languages are used and how they are related. A web page can be likened to a building. The building skeleton is your HTML. Windows, pretty walls, tiles, carpets etc., are your CSS and the escalator is your JavaScript. When you press a lift button, depending on what you press, it either takes you up or down to another floor or opens the doors. You get the gist.
HTML Basics
HTML is a markup language, not a programming language like Java, C, C++, or Python. It's not a programming language because it cant be used to get the computer to do things for us.
HTML Structure
As mentioned above, HTML describes the structure of a web page. HTML consists of a series of elements, which are labelled pieces of content, such as "this is the title", "this is a paragraph", and "this is a link" through the use of tags. The HTML elements tell the browser how to display the content.
On the left-hand side of this image is our basic HTML structure in a code editor, and on the right-hand side is the developer environment of a web server hosted on my local computer.
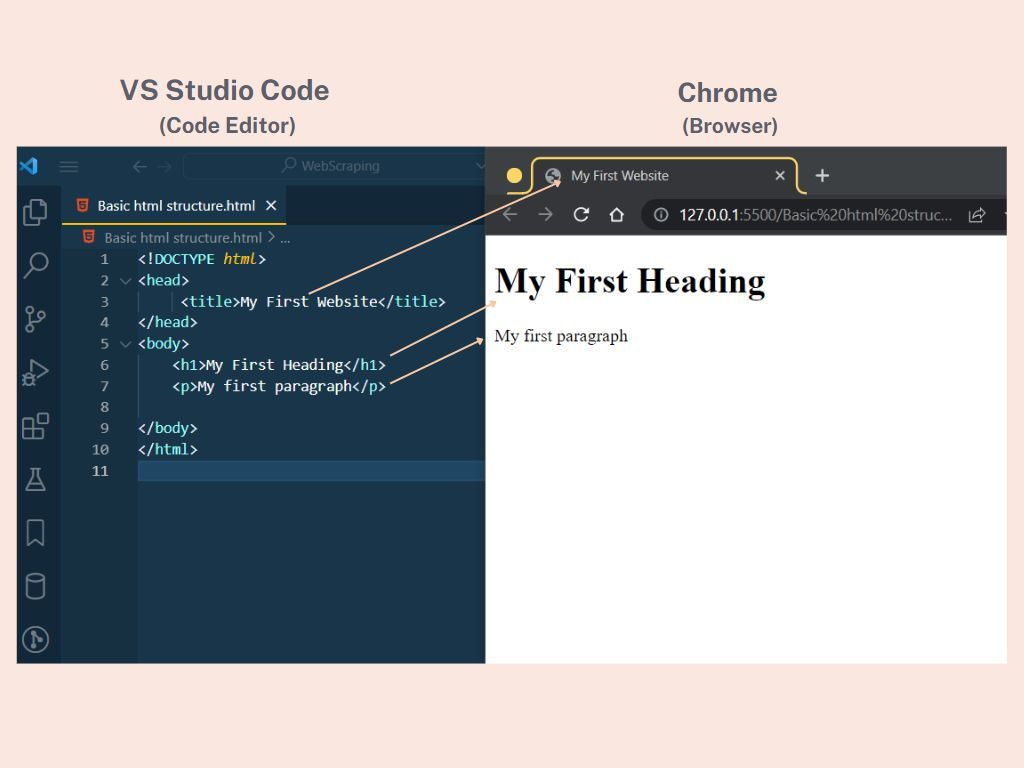
Let me explain the codes.
• The <!DOCTYPE html> is a declaration. It defines that this document is an HTML5 document. There are many versions of HTML. HTML5 is the latest.
• The <html> element is the root element of an HTML page
• The <head> element contains meta-information about the HTML page
• The <title> element specifies the title for the HTML page. It's shown in the browser's title bar or the page's tab.
• The <body> element defines the document's body. Think of it as a container for everything you see on a website, such as headings, paragraphs, images, hyperlinks, tables, lists, etc.
• The <h1> element defines a large heading.
• The <p> element defines a paragraph.
Elements and Tags
I've used the word element multiple times, but you're probably still unclear on what it is, huh?
An HTML element comprises a start tag, some content, and possibly an end tag. Most elements would have an end tag, but some don't. Elements without an end tag are known as empty elements. <br> and <img> are two commonly seen empty elements. Do you know why they don't have end tags? It's because they cannot have any child nodes.
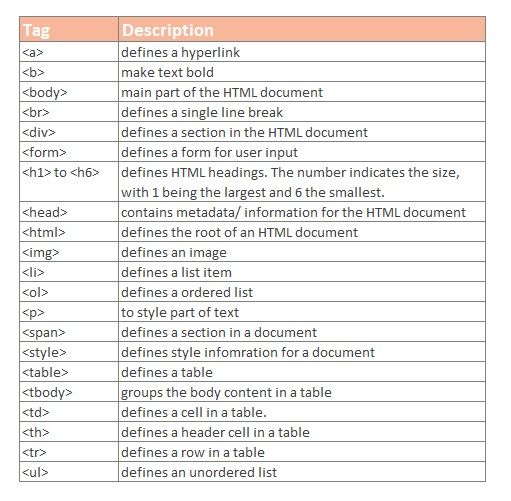
There is a laundry list of HTML tags. It's not practical to go through all, nor do I know all! You can refer to the W3 School HTML Element Reference for all the HTML Tags.
However, I would like to point out a few common tags you'll likely encounter all the time.
Attributes
Another thing you need to know about HTML is attributes. HTML attributes provide additional information about HTML elements. Attributes are always specified in the start tag. It usually comes in what's called name/ value pairs like: name = "value". However, not all attributes need a value, e.g. download.
The attributes in the image below are the yellow texts in the VS Studio Code.
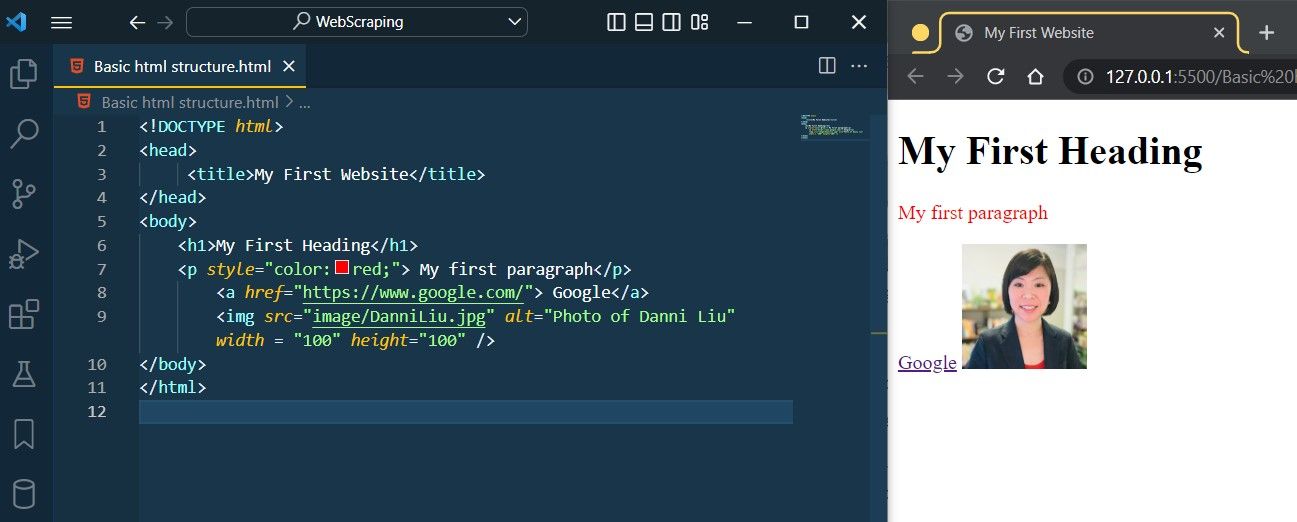
First, we have the style attribute, which is used to add styles to an element, such as colour, font, size and much more.
Next, we have href attribute, which specifies the URL of the page the link goes to.
This is then followed by four attributes of <img> element.
srcattribute specifies the path to the image to be displayedaltattribute specifies an alternate text when the image fails to displaywidthandheightattributes provide size information for images
Like tags, we also have a laundry list of attributes, refer to HTML Attribute Reference for a list of all the attributes.
Apart from the attributes I touched on, there are another two you should acquaint with, they are class and id attributes.
classis an attribute to define different elements with the same class name.idis an attribute to specify a unique ID for an element.
Both id and class attributes identify an element in an HTML document. id is unique to an element, while class can be assigned to many elements. It's common to leverage these two attributes in web scraping.
Inspecting Pages with Developer Tools
Recall in the previous blog that one of the steps involved in web scraping is inspecting the webpage. What we are inspecting is the DOM in the Developer Tools (DevTools).
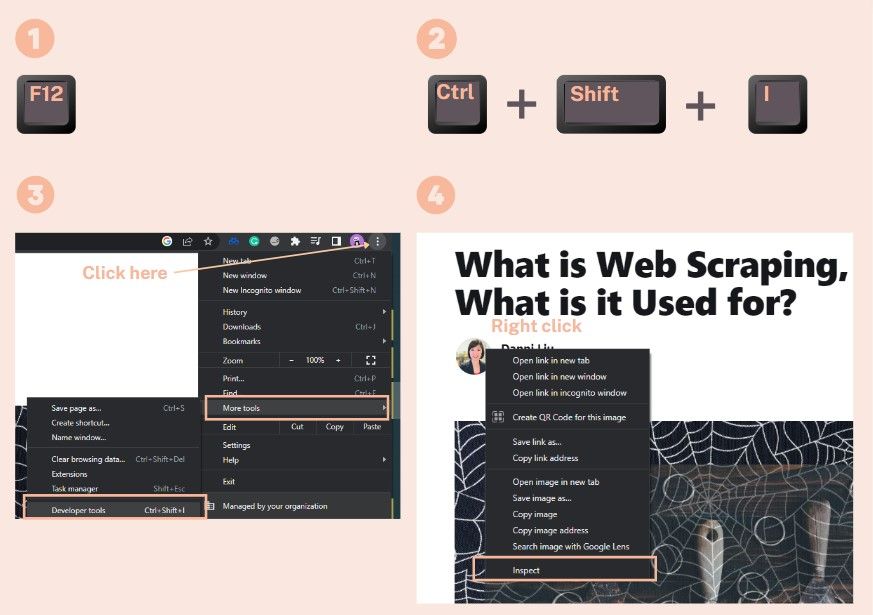
There are several ways to bring up the DevTools. Chrome is my preferred browser, so I'll show you how it's done in Chrome. I believe these methods also work for other browsers.
Here are the methods:
- Pressing F12 Key
- Pressing Clt + Shift + I keys
- Click the 3 dots button to the right of the address bar and select More Tools > Developer Tools
- Right-click on any element on a page and select Inspect
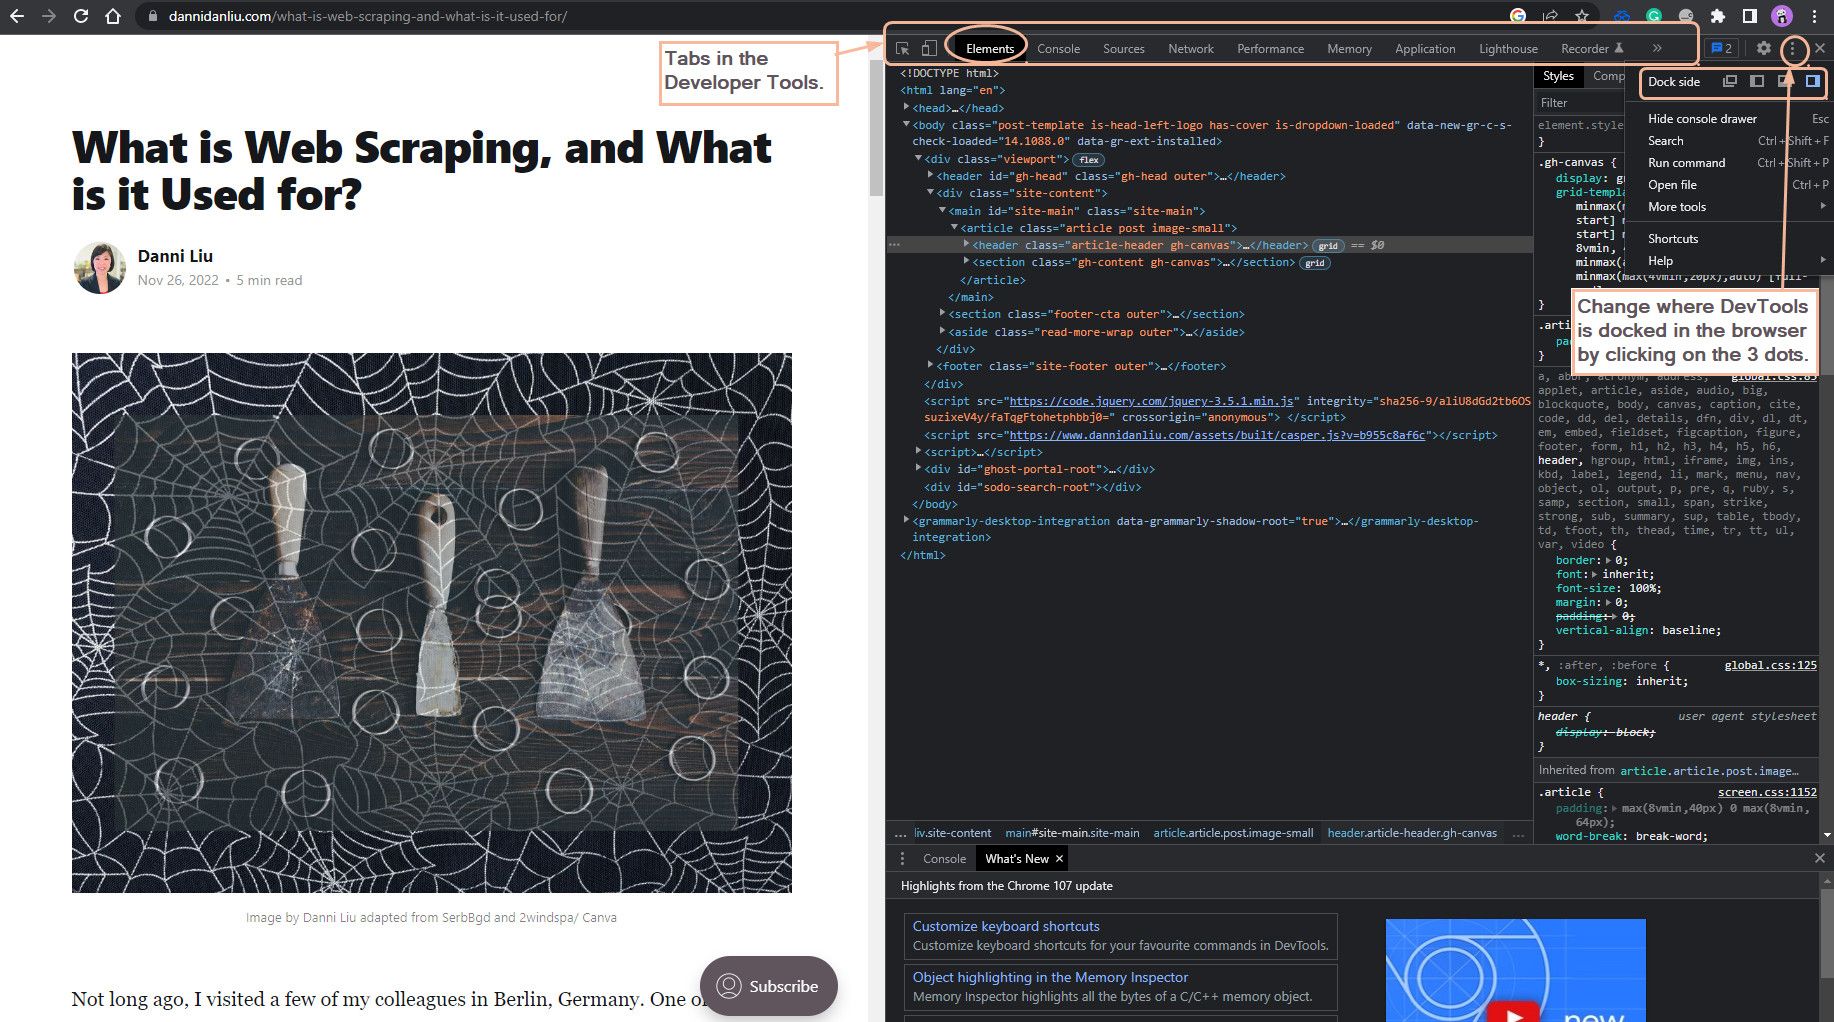
There are many tabs in the developer tools. The one we need to be concerned with is the Elements tab. The Elements tab shows you the HTML used to build the page you're viewing, together with any inline CSS.
You can choose where to dock the DevTools in the browser by clicking on the 3 dots at the top of the DevTools. I like mine on the right-hand side.
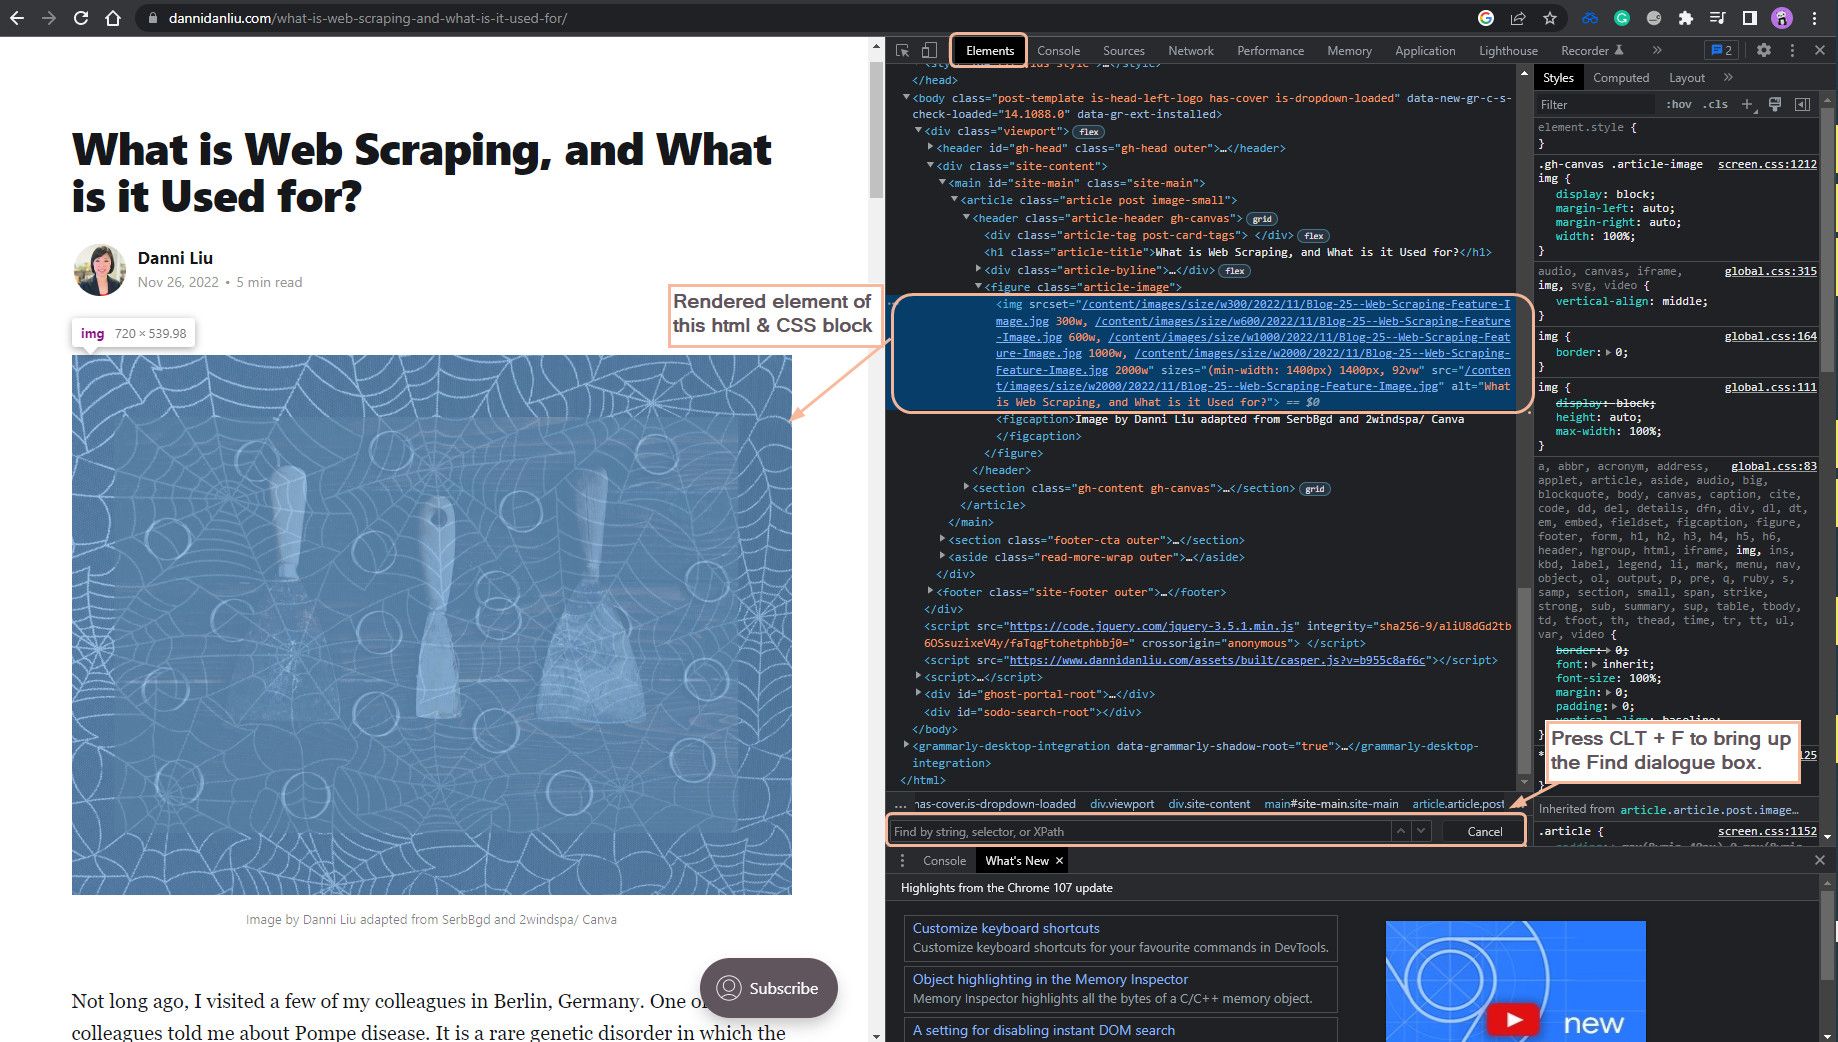
For web scraping, I recommend using method 4: right-click on an element and select inspect. Generally, we are only interested in scraping an aspect of the web page. By right-clicking on the object you are interested in on the web page and selecting inspect, it takes you directly to that element in DOM when the DevTools opens. You don't have to waste time trying to locate it.
Another helpful tip is using CLT + F to find the content you are interested in.
Ok, that's it on the basics of HTML, friends. It's a long blog. I'm going to chill a bit now. Stay tuned for the next topic on CSS.